
随着CTF(夺旗)比赛越来越受人们欢迎,以及在这个领域里像Dragon Sector这样的波兰队伍的卓越表现,我认为用一些使它难以被破解和分析的技巧来演示一个简单的CrackMe结构将会很有趣。
如果你对逆向工程、CTF比赛有好奇心或者想制作自己的CrackMe并逼疯其他的参赛者,那么本文就是专门写给你的。
我是大牛,我要直接找Flag!
如果你已经有了一定的逆向经验,并且想尝试我将在下文提到的CrackMe,那么你可以忽略这篇文章,下载编译好的可执行文件去找到Flag! 一旦你找到了Flag,就可以回到这里将你的发现与我的发现过程相比较。这个 CrackMe 难度中等。
运行此CrackMe可执行文件你可能需要下载Visual C++ Redistributable Packages forVisual Studio 2013.
下载好CrackMe了?不要看我后面的破解过程哦!;)
如果你是想制作自己的CrackMe,那么我邀请你继续读下去……
什么是CrackMe?
你可能熟悉类似HackThisSite.org这样的网站,你可以向这些网站挑战试着找到网页或是其他系统软件中的弱点或安全漏洞来获取隐藏的信息。
CrackMe其实就是一个专门能够让你绕过安全机制并获取正确的密码或序列号的程序。CrackMes在CTF比赛流行起来之前就非常受欢迎。这样,程序员们就可以挑战一下自己的破解实力,也可以测试一下自己的软件保护技术。
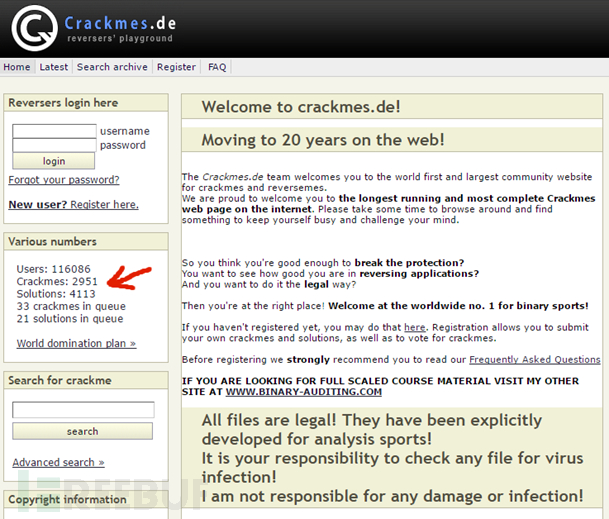
crackmes.de这个网站有超过20年的历史了,而且有几乎3000份文档文件,网站上有关于这些文档的CrackMes和教程。该网站仍然活跃并且一直都在添加新的CrackMes。
有哪些不同类型的CrackMe?
CrackMe程序传统上被划分为以下几类,但主要取决于作者的目的。
这些包括:
CrackMe – 用于生成序列号、许可文件或者用户/密码组合。篡改文件是违法的,并且传统上用CrackMes篡改二进制文件是不受法律保护的。
KeygenMe – 顾名思义,KeygenMe的目的就是创建一个密钥生成器。这不同于一般的CrackMe, 因为通常需要使用有趣的加密算法,并且关于加密和加密算法的知识对于创建Keygen是必要的。通常,使用BIGNUM数据类型的值以及如ECC、RSA或DSA的算法 ,这使得必须暴力破解已知的密钥。
ReverseMe –是CrackMe最复杂的一种形式。目的也许是比如强制程序显示类似“感谢注册”这样的消息。ReverseMes远远不只是使用复杂的加密算法来保护应用程序免于被分析;它们使用许多技术来使得程序文件难以被修改,因为这是最常见的被用于达到目的的方法(例如,改变程序中某些功能的行为)。
UnpackMe –稍不同于CrackMe,你得到的是一个压缩、受保护的文件或者与定制版混淆甚至是商业版打包可执行文件/可执行文件保护程序。目的是解压缩文件,换句话说,恢复可执行文件的原始格式。在大多数情况下,包括重建引入表,恢复原始(编译好的)代码和重建可执行文件结构,所以文件能够在没有保护层的情况下运行。在“homebrew”保护方法的情况下,这可能是一个有趣的挑战,但是如果使用商业级保护,这个逆向将变得相当难。
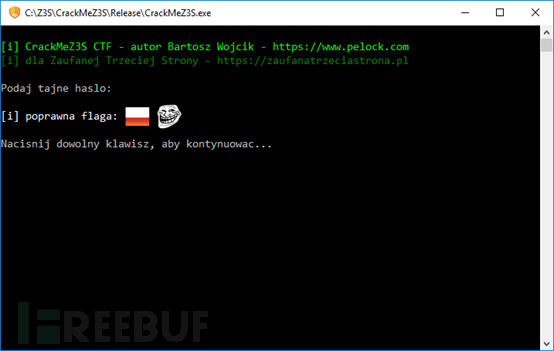
我们的CrackMe目标
在CTF比赛中,通常CrackMe的目标就是获取隐藏的“flag”。我们的CrackMe目标将会是猜测和输入正确的线索,成功后就可以看到flag了。为了提供给那些尝试找出线索的人各种娱乐,每个线索都会以不同的方式输入。
每个线索都有一个简单的验证方法,目的是为了不让这个练习太过于复杂。
操作系统和编程语言
我们的CrackMe将在Windows10上制作(但是在一些旧版本系统比如Windows 7 上面运行也不会出错)。我们将使用C++语言编译为原生的x86代码。我们将使用一些少量有趣的可能不太著名的Windows API。在这个CrackMe中我们将使用可能会对几种反编译工具造成一些困难的UNICODE编码。
TLS回调
首先,我们将使用一种叫做TLS回调的模糊机制。它连接着允许程序的不同线程引用他们自身全局变量的副本的线程本地存储机制的功能。比如在C++中,我们可以将变量声明为具有特殊属性的线程局部变量:
__declspec(thread) int value;
在这种情况下,程序的每一个线程都会处理这个变量本身的副本。其他进程不会注意到通过一个进程对这个变量的改变。
TLS回调是TLS机制的一部分。他们有点像DLL(动态链接库)的入口点——即DllMain()。Windows调用被声明来告诉程序与进程有关联的新载入的库或者新创建的线程的TLS回调。这更像DLLMain()是如何被反复调用的,但是有一点不同:当这个机制被可执行文件使用时,代码会在程序的入口点之前执行。
这个差异就是关键,因为理论上来说,它允许我们悄悄运行一些在不使用正确调试器功能的情况下不太可能被注意到的代码。
TLS回调自Windows XP起就存在了,但它们的操作在不同Windows版本中略有不同(某些事件类型不支持所有版本)。他们被某些软件保护系统用来在实际代码运行之前设置一些反调试功能。They are used by certain software protection systems to set upsome anti-debug features before the actual application code is started.
我们将在CrackMe中利用TLS回调来检查调试的存在。
///////////////////////////////////////////////////////////////////////////////

//

// The TLS callback mechanism allows codeto be executed prior to

// the launch of a program's entry point;this is one place where

// we can hide the initialisation of acouple of things

//

// details about implementing this in C++:

// http://stackoverflow.com/questions/14538159/about-tls-callback-in-windows

//

///////////////////////////////////////////////////////////////////////////////


void NTAPI TlsCallback(PVOID DllHandle, DWORD dwReason, PVOID)

{

    // ensure the reason for calling thecallback is that the application

    // process has been attached, i.e. theapplication has been launched

    // exactly the same as in the DllMain() inDLL libraries

    if (dwReason != DLL_PROCESS_ATTACH)

   {

       return;

   }


    // check the heap flags - in the case of adebugged application

    // they are different to an applicationstarted normally

    // in case adebugger is detected, stop the application

    // at this point

   __asm

   {

       mov     eax, dword ptr fs:[30h]

       test    dword ptr [eax + 68h],HEAP_REALLOC_IN_PLACE_ONLY or HEAP_TAIL_CHECKING_ENABLED orHEAP_FREE_CHECKING_ENABLED

       je      _no_debugger


       _sleep_well_my_angel:


       push    1000000

       call    Sleep


       jmp     _sleep_well_my_angel


       _no_debugger:

   }

}
如果我们用类似OllyDbg v2这样没有用任何插件隐藏自己的调试器来调试CrackMe,那么这个TLS回调代码就会检测调试器并进一步阻止程序加载。看起来就像是软件被挂起了。
校验密钥
每个不同的密钥检查步骤都在独自的线程中运行。在调试一个程序时,多线程操作经常会遇到障碍——有时候是很大的障碍。每个线索验证函数将轮流为下一个函数创建一个线程。
//

// table of addresses of successive key verificationfunctions

// the pointers in this table will beencrypted, and decrypted

// only at the moment when they are readyto be executed

//

// we will store the address adjusted 100bytes forward

// this will cause a hiccup in everydisassembler, since this will

// be treated as a function pointer

// for further entertainment we can addextra dummy entries to this table

//

#define ENCRYPTED_PTR(x, y)reinterpret_cast<PVOID>(reinterpret_cast<DWORD>(&x) + y)


PVOID lpKeyProc[KEYS_COUNT] = {


   ENCRYPTED_PTR(Key0, 100),

   ENCRYPTED_PTR(Key1, 100),

   ENCRYPTED_PTR(Key2, 100),

   ENCRYPTED_PTR(Key3, 100),

   ENCRYPTED_PTR(Key4, 100),

   ENCRYPTED_PTR(Key5, 100),


};


SpeedStart('C');


//

// create 5 EVENT objects, which willserve as markers

// of the validity of the access keys

// also, encrypt the pointers to thefunctions which

// check the validity of the keys

//

for (int i = 0; i <KEYS_COUNT; i++)

{

   hEvents[i] = CreateEvent(nullptr, TRUE, FALSE, nullptr);

   lpKeyProc[i] = static_cast<LPTHREAD_START_ROUTINE>(EncodePointer(reinterpret_cast<PVOID>(reinterpret_cast<DWORD>(lpKeyProc[i]) - 100)));

}


//

// fire up the first thread which willpretend to verify the serial number

// it will start successive threads whichwill run successive procedures

// to verify access keys

//

hThreads[0] = CreateThread(nullptr, 0, static_cast<LPTHREAD_START_ROUTINE>(DecodePointer(lpKeyProc[0])),lpKeyProc, 0, &dwThreadIds[0]);


SpeedEnd('C');


// wait for all threads to be initialised(in case someone tries to skip something)

// the threads are started in a chainreaction, so their handles will not all

// be generated yet, and so we can't useWaitForMultipleObjects()

for (int i = 0; i <_countof(hThreads); i++)

{

    while (hThreads[i] == nullptr)

   {

       OutputDebugString(_T("What's up, Doc?"));

   }

}


// wait for all threads to finish working

WaitForMultipleObjects(_countof(hThreads),hThreads, TRUE, INFINITE);
校验访问密钥后,我们将用事件系统来记录哪些密钥已正确输入。
Key 0 – 假密钥
我们如何输入第一个线索?CrackMe往往直接提示用户输入序列号或者密码,所以让我们跟着这个思路走下去。我们的CrackMe将要求输入一个密码,仔细检查它的有效性并记录结果,只有在最后的验证阶段才能忽略它。
这将是CrackMe在控制台要求输入的一个密钥,所以它会非常显眼。但是这个密钥与这个CrackMe毫不相干。不管它是否正确都不要紧。
为了让攻击者掉进我们的圈套,我们将使用一种非常盘普遍的(但是过时的)基于MD5算法的哈希技术。我们将把密钥哈希与单词“fake”的硬编码哈希进行对比。
这个短单词的哈希可以轻易地在提前计算好的单词和字母组合表(叫做彩虹表)中找到或者用类似Johnthe Ripper/hashcat的密码破解器。
///////////////////////////////////////////////////////////////////////////////

//

// Fake key - to waste an attacker's time;)

//

///////////////////////////////////////////////////////////////////////////////


DWORD WINAPI Key0(LPTHREAD_START_ROUTINE lpKeyProc[])

{

    // start up the next thread (chainreaction style)

   hThreads[1] = CreateThread(nullptr, 0, static_cast<LPTHREAD_START_ROUTINE>(DecodePointer(lpKeyProc[1])),lpKeyProc, 0, &dwThreadIds[1]);


   _tprintf(_T("Enterthe secret key: "));


    // read the password as an ANSI string (sothat it's not too difficult

    // for an attacker to find the passworde.g. using rainbow tables.

    // We'll do them a favour by choosing ANSIover UNICODE)

   gets_s(szPassword, sizeof(szPassword));


    // start measuring time here so thatgets_s() doesn't

    // artificially extend the time

   SpeedStart('0');


    if (strlen(szPassword) > 0)

   {

       // encrypted with https://www.stringencrypt.com (v1.1.0) [C/C++]

       // szFakeHash ="144C9DEFAC04969C7BFAD8EFAA8EA194"

       unsigned char szFakeHash[33];


       szFakeHash[2] = 0xA8; szFakeHash[0] = 0xCD; szFakeHash[10] = 0xBC;szFakeHash[30] = 0x28;

       szFakeHash[16] = 0x0A; szFakeHash[13] = 0x0D; szFakeHash[29] = 0x76;szFakeHash[14] = 0x30;

       szFakeHash[12] = 0x01; szFakeHash[32] = 0xEC; szFakeHash[3] = 0xCE;szFakeHash[31] = 0x3B;

       szFakeHash[15] = 0x48; szFakeHash[1] = 0x33; szFakeHash[25] = 0x27;szFakeHash[27] = 0xD9;

       szFakeHash[9] = 0x5F; szFakeHash[17] = 0x93; szFakeHash[24] = 0x8B;szFakeHash[7] = 0x9C;

       szFakeHash[26] = 0x5A; szFakeHash[23] = 0x24; szFakeHash[18] = 0x66;szFakeHash[19] = 0x06;

       szFakeHash[5] = 0xC1; szFakeHash[28] = 0x69; szFakeHash[21] = 0xF8;szFakeHash[20] = 0x9D;

       szFakeHash[4] = 0xFC; szFakeHash[22] = 0x44; szFakeHash[6] = 0xFF;szFakeHash[11] = 0x42;

       szFakeHash[8] = 0x83;


       for (unsigned int GpjcO = 0, qeVjl;GpjcO < 33; GpjcO++)

       {

           qeVjl = szFakeHash[GpjcO];

           qeVjl = (((qeVjl & 0xFF) >> 2) | (qeVjl << 6)) &0xFF;

           qeVjl += GpjcO;

           qeVjl = (((qeVjl & 0xFF) >> 5) | (qeVjl << 3)) &0xFF;

           qeVjl ^= 0xF7;

           qeVjl = ~qeVjl;

           qeVjl ^= GpjcO;

           qeVjl--;

           qeVjl = ~qeVjl;

           qeVjl -= 0xDF;

           qeVjl = ((qeVjl << 6) | ((qeVjl & 0xFF) >> 2)) &0xFF;

           qeVjl--;

           qeVjl ^= 0x76;

           qeVjl += 0xF0;

           qeVjl -= GpjcO;

           qeVjl ^= GpjcO;

           qeVjl = ~qeVjl;

           qeVjl += GpjcO;

           qeVjl = (((qeVjl & 0xFF) >> 2) | (qeVjl << 6)) &0xFF;

           qeVjl += 0x2C;

           qeVjl = ((qeVjl << 4) | ((qeVjl & 0xFF) >> 4)) &0xFF;

           qeVjl -= 0xFF;

           qeVjl = ((qeVjl << 1) | ((qeVjl & 0xFF) >> 7)) &0xFF;

           qeVjl = ~qeVjl;

           qeVjl++;

           qeVjl = (((qeVjl & 0xFF) >> 4) | (qeVjl << 4)) &0xFF;

           qeVjl -= 0xEF;

           qeVjl = (((qeVjl & 0xFF) >> 2) | (qeVjl << 6)) &0xFF;

           qeVjl -= 0xF7;

           qeVjl = (((qeVjl & 0xFF) >> 3) | (qeVjl << 5)) &0xFF;

           qeVjl -= 0x48;

           qeVjl = ~qeVjl;

           qeVjl -= GpjcO;

           qeVjl ^= GpjcO;

           qeVjl += 0xE6;

           qeVjl ^= 0xB4;

           qeVjl -= 0x9D;

           qeVjl = ~qeVjl;

           qeVjl--;

           qeVjl ^= GpjcO;

           qeVjl += 0x17;

           qeVjl ^= 0x55;

           qeVjl += GpjcO;

           qeVjl += 0xB3;

           qeVjl = (((qeVjl & 0xFF) >> 3) | (qeVjl << 5)) &0xFF;

           qeVjl -= 0xCE;

           qeVjl = ~qeVjl;

           qeVjl += 0x9B;

           qeVjl ^= 0x71;

           qeVjl--;

           qeVjl = ((qeVjl << 7) | ((qeVjl & 0xFF) >> 1)) &0xFF;

           szFakeHash[GpjcO] = qeVjl;

       }


       // compare withthe hash of the word "fake" (https://www.pelock.com/products/hash-calculator)

       if (CheckMD5(szPassword, strlen(szPassword), reinterpret_cast<char*>(szFakeHash)) == TRUE)

       {

           SetEvent(hEvents[0]);

       }

   }


   SpeedEnd('0');


    return 0;

}
值得记住的是,延长代码分析的时间是阻止潜在攻击者的最好方法之一。 虽然“拖延战术”在理论上容易被绕过,但是我们不能因为这样就忽略它们,因为在实践中他们非常有效。当做了很多无用功之后,攻击者还可能会沮丧,这正是我们想要的结果。
顺便提一句,游戏的保护系统通常不是“不可破坏的”,而是被设计用于延长游戏发布者可以在游戏发布后销售许多游戏副本的时间的唯一目的。在这种情况下,媒体在标题中宣传这种保护的“破坏”这是虚幻的——骇客和海盗满意地宣布胜利,拍拍对方的肩膀大唱“everything can bebroken”,甚至都没反应过来到底谁才是赢家。

Key 1 – 环境变量
我们的下一个必须用比如环境变量编辑器设置的线索将从环境变量中收集到。为了制作这个圈套,我们将使用一个标准的Windows环境变量——“PROCESSOR_ARCHITECTURE”,但是有一个小小的拼写错误(“S”而不是“SS”),即“PROCESOR_ARCHITECTURE”。
该变量的正确值在64位系统上是可以看见的,除非在后面有一个空格,即“AMD64 ”。
假如有人列出环境变量,比如输入“set”命令,但是他们可能不会注意到后面的空格。在Windows 10 上,可以使用简单命令更改环境变量:
set PROCESOR_ARCHITECTURE=AMD64 ← spaceat the end
或者可以通过摁下Win+R 并输入“sysdm.cpl”启动环境变量编辑器。
Key 2– 隐藏ADS线索
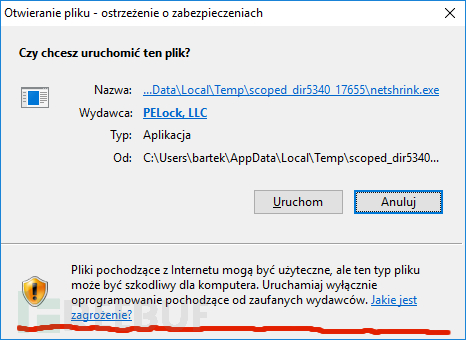
NTFS格式文件系统允许程序在文件中保存附加的“流”。这个功能叫做备用数据流并且可以在文件用来隐藏附加的数据,这在Windows资源管理器中是看不见的。这个功能被Web浏览器用来追踪文件下载来源。当一份文件被从因特网上下载下来,附加流“:ZoneIdentifier”就会附加到那份文件。这就是为什么当你尝试运行从互联网上下载文件时,你会得到这些恼人的警告消息。
ADS机制同时被恶意软件用于隐藏数据。不过,用在CrackMe中是一个有趣的方法,而且我们将在下一个密钥中利用它。
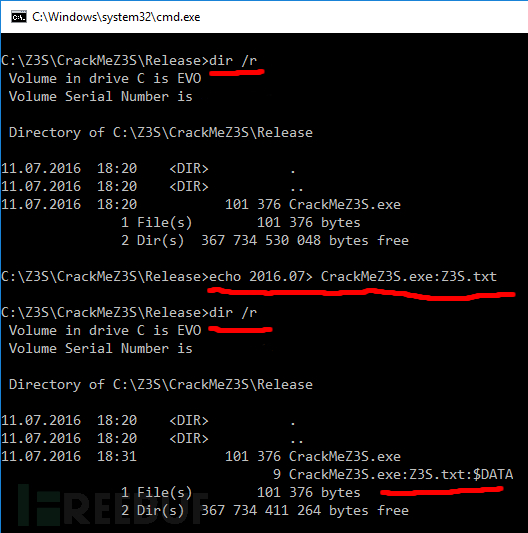
我们将在CrackMe自身文件中去查找它;在指定的“CrackMeZ3S.exe:Z3S.txt”流中。
///////////////////////////////////////////////////////////////////////////////

//

// Key 2 - checking ADS

//

///////////////////////////////////////////////////////////////////////////////


DWORD WINAPI Key2(LPTHREAD_START_ROUTINE lpKeyProc[])

{

   SpeedStart('2');


    // start up the next thread (chainreaction style)

   hThreads[3] = CreateThread(nullptr, 0, static_cast<LPTHREAD_START_ROUTINE>(DecodePointer(lpKeyProc[3])),lpKeyProc, 0, &dwThreadIds[3]);


   TCHAR wszPath[512] = { 0 };


    // get the path to the CrackMe executable

   GetModuleFileName(GetModuleHandle(nullptr), wszPath, sizeof(wszPath));


    // add the ADS suffix

   _tcscat_s(wszPath, _countof(wszPath), _T(":Z3S.txt"));


    // open the stream"CrackMeZ3S.exe:Z3S.txt"

    HANDLEhFile = CreateFile(wszPath, GENERIC_READ, FILE_SHARE_READ, nullptr, OPEN_EXISTING, 0, nullptr);


   SpeedEnd('2');


    // check if open was successful

    if (hFile == INVALID_HANDLE_VALUE)

   {

       return 0;

   }


    // find the file size

   DWORD dwFileSize = GetFileSize(hFile, nullptr);


    // ensure that it will fit in the buffer

    if (dwFileSize > sizeof(szADS))

   {

       CloseHandle(hFile);

       return 0;

   }


   DWORD dwReadBytes = 0;


    // read the contents of the secret stream

    if (ReadFile(hFile, &szADS, dwFileSize, &dwReadBytes, nullptr) == FALSE || dwReadBytes != dwFileSize)

   {

       CloseHandle(hFile);

       return 0;

   }


   CloseHandle(hFile);


    char szTemp[sizeof(szADS)];


   strcpy_s(szTemp, _countof(szTemp), szADS);


    // reverse the string

   _strrev(szTemp);


    if (strcmp(szTemp, "\n\r70.6102") == 0)

   {

       // set the flagwhich indicates the ADS key was verified

       SetEvent(hEvents[2]);

   }


    return 0;

}
可以通过在命令行里运行以下命令设置密钥的必须值:
echo 2016.07> CrackMeZ3S.exe:Z3S.txt
运行以下命令则可以检查流是否创建成功:
dir /r
重要的是注意在“>”之前是没有空格的。稍不注意就会输多一个空格,并且这会得到一个无效的密钥。
Key 3 – 剪切板
下一个密钥将从剪切板中获得。CrackMe需要一个特定的文本值来存储。我可不是在说一个银行账号!;)
///////////////////////////////////////////////////////////////////////////////

//

// Key 3 - checking the clipboard

//

///////////////////////////////////////////////////////////////////////////////


DWORD WINAPI Key3(LPTHREAD_START_ROUTINE lpKeyProc[])

{

   SpeedStart('3');


    // start up the next thread (chainreaction style)

   hThreads[4] = CreateThread(nullptr, 0, static_cast<LPTHREAD_START_ROUTINE>(DecodePointer(lpKeyProc[4])),lpKeyProc, 0, &dwThreadIds[4]);


    // open the clipboard

    if (OpenClipboard(nullptr) == TRUE)

   {

       // get a handle tothe data in CF_TEXT format

       HANDLE hData = GetClipboardData(CF_TEXT);


       // was any dataobtained?

       if (hData != nullptr)

       {

           // lock memory

            char *pszText = static_cast<char *>(GlobalLock(hData));


           if (pszText != nullptr)

           {

                // hehe ;)点击并拖拽以移动

                if (strcmp(pszText, "Boom Boom - Lip Lock - Song") == 0)

                {

                   // copy the clipboard contents to a globalvariable

                    strcpy_s(szClipboard, sizeof(szClipboard), pszText);


                    // set the flag for this key

                    SetEvent(hEvents[3]);

               }

           }


           GlobalUnlock(hData);

           CloseClipboard();

       }

   }


   SpeedEnd('3');


    return 0;

}
在这种情况下,设置密钥是不言而喻的。只需要Ctrl-C就OK了!
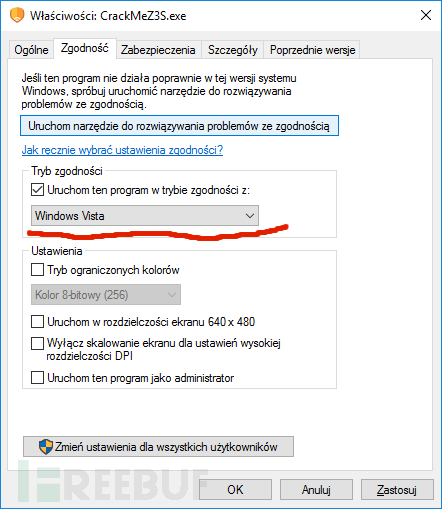
Key 4 – 检查兼容性模式
Windows允许行为类似于在旧版本Windows上的程序在“兼容模式”中运行,这是为了那些在新的操作系统中可能无法正常运行的程序。我们将使用这个设置作为我们的下一个密钥,检查下程序是否在Windows Vista模式下运行的。
///////////////////////////////////////////////////////////////////////////////

//

// Key 4 - checking compatibility mode

//

///////////////////////////////////////////////////////////////////////////////


DWORD WINAPI Key4(LPTHREAD_START_ROUTINE lpKeyProc[])

{

   SpeedStart('4');


    // start up the next thread (chainreaction style)

   hThreads[5] = CreateThread(nullptr, 0, static_cast<LPTHREAD_START_ROUTINE>(DecodePointer(lpKeyProc[5])),lpKeyProc, 0, &dwThreadIds[5]);


   osvi.dwOSVersionInfoSize = sizeof(OSVERSIONINFO);


    // the GetVersionEx() function has beendeprecated,

    // but for our CrackMe it'll do fine

    #pragma warning(disable : 4996)

   GetVersionEx(&osvi);


    // the numbering will match Windows Vistaand Windows Server 2008

    // https://msdn.microsoft.com/pl-pl/library/windows/desktop/ms724833(v=vs.85).aspx

    if (osvi.dwMajorVersion == 6 && osvi.dwMinorVersion == 0)

   {

       // set the flagindicating the compatibility mode is set correctly

       SetEvent(hEvents[4]);

    }


   SpeedEnd('4');


    return 0;

}
这个检查十分不明显,因为它看起来仅仅是简单地识别了一下Windows版本。为了保证密钥可用,你可以在文件属性中更改“CrackMeZ3S.exe”的兼容模式,或者在Windows Vista上运行(现在还有人在使用它?)。
如果任何人想要在比Windows Vista版本更旧的系统上攻击这个CrackMe,他们既要给代码手工打补丁,又要给函数GetVersionEx()设置钩子,以便于表明Windows Vista。
Key 5 – 拦截Ctrl-C
在我们的CrackMe中,我们将给Ctrl-C控制台事件设置一个处理函数来正常地结束控制台程序。我们将检查用户在执行CrackMe的过程中是否输入了Ctrl-C组合。
///////////////////////////////////////////////////////////////////////////////

//

// handler for the Ctrl-C shortcut

//

///////////////////////////////////////////////////////////////////////////////


BOOL CtrlHandler(DWORD fdwCtrlType)

{

    switch (fdwCtrlType)

   {

    case CTRL_C_EVENT:


       // set the flagwhich indicates the user pressed Ctrl-C

       SetEvent(hEvents[5]);


       return TRUE;

   }


    return FALSE;

}


///////////////////////////////////////////////////////////////////////////////

//

// Key 5 - check whether the user haspressed Ctrl-C

//

///////////////////////////////////////////////////////////////////////////////


DWORD WINAPI Key5(LPTHREAD_START_ROUTINE lpKeyProc[])

{

   SpeedStart('5');


    // set up Ctrl-C handler

   SetConsoleCtrlHandler(reinterpret_cast<PHANDLER_ROUTINE>(CtrlHandler),TRUE);


   SpeedEnd('5');


    return 0;

}
按下Ctrl-C将同时设置这个密钥的flag并结束CrackMe。
所有的密钥都被设置了——下一步怎么样?
如果所有的密钥验证线程都结束了,密钥也检测到了,而且用户按下了Ctrl-C,攻击者希望找到的“flag”将会从密钥中的各个字母构成。
///////////////////////////////////////////////////////////////////////////////

//

// Verifies the correctness of all thekeys, and generates

// a flag from individual letters of thekeys

//

// The correct flag:

//

// "PELock v2.0"

// 01234567890

//

///////////////////////////////////////////////////////////////////////////////


DWORD WINAPI Check(DWORD Param)

{

   SpeedStart('C');


    // Key 0 - fake key

    if (WaitForSingleObject(hEvents[0], 1) == WAIT_OBJECT_0)

   {

       // misleadingwrites - the characters in this password

       // will not beused (we're writing them past the end

       // of the buffer)

       wszFlag[16] = TCHAR(szPassword[4]);

       wszFlag[12] = TCHAR(szPassword[1]);


       #ifdef _DEBUG

       _tprintf(_T("[i]key 0 - OK\n"));

       #endif

   }


    // Key 1 - environment variables

    if (WaitForSingleObject(hEvents[1], 1) == WAIT_OBJECT_0)

   {

       // "PELock[]v2.0" - "AMD64[ ]"

       wszFlag[6] = wszEnvrionmentVariable[5];


       #ifdef _DEBUG

       _tprintf(_T("[i]key 1 - OK\n"));

       #endif

   }


    // Key 2 - ADS

    if (WaitForSingleObject(hEvents[2], 1) == WAIT_OBJECT_0)

   {

       // "PELockv[2].[0]" - "[2][0]16.07"

       wszFlag[8] = TCHAR(szADS[0]);

       wszFlag[10] = TCHAR(szADS[1]);

       wszFlag[9] = TCHAR(szADS[4]);


       #ifdef _DEBUG

       _tprintf(_T("[i]key 2 - OK\n"));

       #endif

   }


    // Key 3 - clipboard contents

    if (WaitForSingleObject(hEvents[3], 1) == WAIT_OBJECT_0)

   {

       // "Boom Boom- Lip Lock - Song"

       wszFlag[4] = TCHAR(szClipboard[18]);

       wszFlag[3] = TCHAR(szClipboard[17]);

       wszFlag[2] = TCHAR(szClipboard[16]);

       wszFlag[5] = TCHAR(szClipboard[19]);


       #ifdef _DEBUG

       _tprintf(_T("[i]key 3 - OK\n"));

       #endif

   }


    // Key 4 - pressing Ctrl-C

    if (WaitForSingleObject(hEvents[4], 1) == WAIT_OBJECT_0)

   {

       // missing letter

       wszFlag[7] = TCHAR('v');


       #ifdef _DEBUG

       _tprintf(_T("[i]key 4 - OK\n"));

       #endif

   }


    // Key 5 - system version matching WindowsVista

    if (WaitForSingleObject(hEvents[5], 1) == WAIT_OBJECT_0)

   {

       // letter 'P' =0x4A + 6

       wszFlag[0] = TCHAR(0x4A + osvi.dwMajorVersion);


       // letter 'E' =0x45 - 0

       wszFlag[1] = TCHAR(0x45 - osvi.dwMinorVersion);


       #ifdef _DEBUG

       _tprintf(_T("[i]key 5 - OK\n"));

       #endif

   }


   SpeedEnd('C');


    return 0;

}
在显示包含flag的胜利消息之前,我们将通过检查它附加“盐”的加密哈希来验证:
//

// calculate MD5 from the flag string andsalt

// (in order to thwart brute-forceattacks)

// the point of this is to guard againstsituations

// where somebody bypasses some of thedefences

// (e.g. by manually setting up theEVENTs)

//

TCHAR wszFlagSalty[128];


_stprintf_s(wszFlagSalty, _T("#flag4poprawna %s \n123458s3cr3t_+=-=-="), wszFlag);


// calculate the hash from a TCHAR string;the result is an ANSI string

BOOL bValidFlag = CheckMD5(wszFlagSalty,_tcslen(wszFlagSalty) * sizeof(TCHAR), "4ED28DA4AAE4F2D58BF52EB0FE09F40B");


SpeedEnd('V');


if (bValidFlag == TRUE)

{
这样做是为了确保提供的密钥是有效的,例如,代码在调试器中没有被修改以跳过前面的部分并容易地到达这个代码片段。
反调试
你真能够把我们不使用任何防御调试的程序叫做适合的CrackMe吗?我们的CrackMe在这个领域是不可缺少的。Our CrackMe won’t be lacking in this department.我们可以使用其中一个基于像IsDebuggerPresent()这样的WinAPI函数的流行方法,但是它们的受欢迎程度和对它们的广泛了解意味着在我们开始之前就会被打败。除此之外,我已经看到过IsDebuggerPresent()很多次了以至于任何时候看到它我都想哭。

在调试器中检测我们的程序何时运行
我们将在CrackMe中添加一些代码用于在它运行时检测一些用来分析软件的流行工具,即编译器。编译器允许在不用访问源代码的情况下追踪编译好的程序。它们以汇编指令的形式显示编译好的程序代码,这些指令被允许逐步执行。调试器还允许当程序到达指定指令(俗称“断点”)或调用特定系统函数时停止运行,比如,使用MessageBox()函数来显示一个弹窗消息告诉你“你的密钥不不正确”。
我们将利用一个简单的事实,当一个程序不管被哪个调试器调试时,它明显会运行地很慢,因为调试机制会减慢所有指令的执行速度。
这种缓慢来自哪里?看看基于WinAPI函数的标准调试器循环你就会明白有多少事情在发生了!此外,调试器用户进一步减慢了运行速度,看到当他或她将执行一些指令,检查一些寄存器值,查看一些文档,这样使得延时了几秒而不是几微秒。
我们将获得执行指定代码段所花的时间,并且假设CrackMe不是在Commodore 64或Atari上的PC仿真机中运行,那么执行少数指令的时间是绝不会接近5秒的,但是有些人在调试器中这样跟踪代码将很轻易就花掉更多的时间。
///////////////////////////////////////////////////////////////////////////////

//

// gets the start time - this functionMUST be inline to prevent

// someone simply patching the function inone place

//

///////////////////////////////////////////////////////////////////////////////


void __forceinline SpeedStart(intiSpeedStructIndex)

{

   QueryPerformanceFrequency(&Speed[iSpeedStructIndex].Frequency);

   QueryPerformanceCounter(&Speed[iSpeedStructIndex].StartingTime);

}


///////////////////////////////////////////////////////////////////////////////

//

// gets the end time and checks whetherexecution time

// exceeds the specified limit

//

///////////////////////////////////////////////////////////////////////////////


void __forceinline SpeedEnd(intiSpeedStructIndex, int iMaxTimeInSeconds = 5)

{

   QueryPerformanceCounter(&Speed[iSpeedStructIndex].EndingTime);

   Speed[iSpeedStructIndex].ElapsedMicroseconds.QuadPart =Speed[iSpeedStructIndex].EndingTime.QuadPart -Speed[iSpeedStructIndex].StartingTime.QuadPart;


    //Speed[iSpeedStructIndex].ElapsedMicroseconds.QuadPart*= 1000000;

   Speed[iSpeedStructIndex].ElapsedMicroseconds.QuadPart /=Speed[iSpeedStructIndex].Frequency.QuadPart;


    // check whether the time limit wasexceeded

    if (Speed[iSpeedStructIndex].ElapsedMicroseconds.QuadPart >iMaxTimeInSeconds)

   {

       #ifdef _DEBUG

       _tprintf(_T("[!]the limit of %i seconds was exceeded for index %c, execution time %llu"), iMaxTimeInSeconds, iSpeedStructIndex,Speed[iSpeedStructIndex].ElapsedMicroseconds.QuadPart);

       #endif


       // in case of thetime limit being exceeded, no error is

       // displayed, butwe will corrupt the internal structure of

       // the CrackMe,which will cause the CrackMe to

       // malfunction orsimply hang at some point


       // randomly decidewhether to corrupt something or not

       #defineLOTTO_CRASH ((rand() & 6) == 0)


       // decide whetherto erase a thread handle

       if (LOTTO_CRASH) hThreads[rand() %_countof(hThreads)] = nullptr;


       // decide whetherto erase an event handle

       if (LOTTO_CRASH) hEvents[rand() %_countof(hEvents)] = reinterpret_cast<HANDLE>(rand());


       // decide whetherto reset an event (the indicator of a valid access key)

       if (LOTTO_CRASH) ResetEvent(hEvents[rand() %_countof(hEvents)]);


       // randomly filltext buffers

       if (LOTTO_CRASH) memset(wszEnvrionmentVariable,_countof(wszEnvrionmentVariable) * sizeof(TCHAR), rand());

       if (LOTTO_CRASH) memset(szADS, sizeof(szADS), rand());

       if (LOTTO_CRASH) memset(szClipboard, sizeof(szClipboard), rand());

       if (LOTTO_CRASH) memset(szPassword, sizeof(szPassword), rand());

       if (LOTTO_CRASH) memset(wszFlag, _countof(wszFlag) * sizeof(TCHAR), rand());


       // evil asm trick;), corrupt the stack pointer

       // this isguaranteed to cause the application to crash

       if (LOTTO_CRASH) __asm inc esp

   }

}
假如我们检测到这些长执行时间,我们就不向用户显示任何关于它的消息。这可能是我们能做的最糟糕的事了,因为它会给攻击者一个问题出在哪里的明确指示。相反,我们将随机破坏内部数据缓冲区和表明验证码的个别事件。因此,即使提供了正确的验证码,只要CrackMe在调试器中运行,正确的flag就不会生成。
这种类型的保护可以通过利用调试器插件或为判断时间的函数创建一个钩子的方式来绕过,这可以给程序一个伪造的时序结果。
编译器和链接选项
尽管事实上我们的CrackMe是用C++写的,而不是用汇编语言,我们可以通过使用适当的编译器和链接选项进一步完成这个挑战。在我们的CrackMe中,我们将应用地址空间布局随机化(ASLR),这将导致我们的可执行文件被默认重定位,并且每次启动时,Windows会把它加载到内存中一个不同的基址。
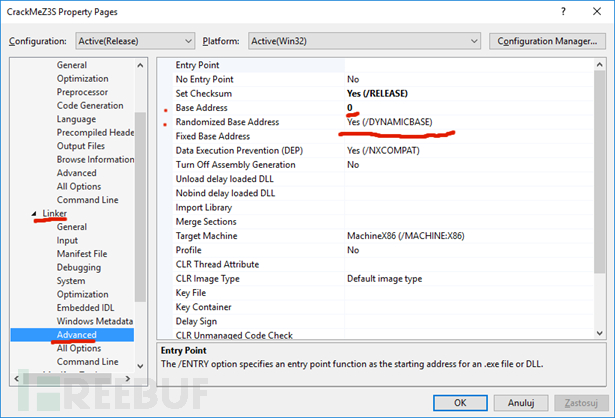
攻击者可能会忘记在他们的调试器中确定的虚拟地址设置断点每次程序运行时,代码都会在不同的内存范围,通过反编译得到的函数地址是无用的。换句话说,就是会非常蛋疼。
然而一个聪明的攻击者会把重定位信息移除,并使得EXE映像总是被加载到相同的基址上。为此,我们将基址设置为0。这种做法不常见,然而在ALSR的情况下,微软建议将基址设置为0。奇怪的是,他们的编译器默认不会实现这个。
人们会如何为了使他们的生活变得更轻松去绕过这个保护,不只是在这个CrackMe情况中,而是在其他程序分析中?首先,可执行文件将必须重定位到任意有效的基址,例如默认的0×400000,然后需要删除重定位信息或在PE (可移植文件)文件头中的地址空间布局随机化flag。
总结
如你所见,在密钥验证中有丰富的创造性方法;他们大多数隐藏在很少用到的Windows特性或者过时的WinAPI函数中。他们可以成功地被作为元素用到各种CrackMe中。愿意分享你下的思路吗?在评论中大致描述下你的有趣的思路或者你在其它CrackMe中见到过的。
压缩包密码:“CrackMeZ3S”。
关于作者
- 还没有人评论,欢迎说说您的想法!